教學:我是誰? (Tutorial: Who am I?)
本教學將引導你設定 MCP Auth,以驗證 (Authentication) 使用者並從授權 (Authorization) 伺服器取得其身分資訊。
完成本教學後,你將會:
- ✅ 基本瞭解如何使用 MCP Auth 進行使用者驗證 (Authentication)。
- ✅ 擁有一個 MCP 伺服器,並能提供工具來取得使用者身分資訊。
概覽 (Overview)
本教學將涉及以下元件:
- MCP 伺服器:一個簡單的 MCP 伺服器,使用 MCP 官方 SDK 處理請求。
- MCP inspector:MCP 伺服器的視覺化測試工具,同時作為 OAuth / OIDC 用戶端,啟動授權流程並取得存取權杖 (Access token)。
- 授權伺服器 (Authorization server):一個 OAuth 2.1 或 OpenID Connect 提供者,負責管理使用者身分並簽發存取權杖 (Access token)。
以下是這些元件間互動的高階圖示:
瞭解你的授權伺服器 (Understand your authorization server)
取得使用者身分資訊 (Retrieving user identity information)
為完成本教學,你的授權伺服器應提供 API 以取得使用者身分資訊:
- Logto
- Keycloak
- OIDC
- OAuth 2
Logto 是一個 OpenID Connect 提供者,支援標準的 userinfo endpoint 來取得使用者身分資訊。
要取得可用於 userinfo endpoint 的存取權杖 (Access token),至少需兩個權限範圍 (Scopes):openid 與 profile。你可以繼續閱讀,稍後會介紹權限範圍設定。
Keycloak 是一個開源身分與存取管理解決方案,支援多種協議,包括 OpenID Connect (OIDC)。作為 OIDC 提供者,它實作了標準的 userinfo endpoint 以取得使用者身分資訊。
要取得可用於 userinfo endpoint 的存取權杖 (Access token),至少需兩個權限範圍 (Scopes):openid 與 profile。你可以繼續閱讀,稍後會介紹權限範圍設定。
大多數 OpenID Connect 提供者都支援 userinfo endpoint 以取得使用者身分資訊。
請查閱你的提供者文件,確認是否支援此 endpoint。如果你的提供者支援 OpenID Connect Discovery,也可檢查 discovery 文件(.well-known/openid-configuration 回應)中是否包含 userinfo_endpoint。
要取得可用於 userinfo endpoint 的存取權杖 (Access token),至少需兩個權限範圍 (Scopes):openid 與 profile。請查閱你的提供者文件,瞭解權限範圍與使用者身分宣告 (Claims) 的對應關係。
雖然 OAuth 2.0 沒有定義標準方式來取得使用者身分資訊,許多提供者會實作自有 endpoint。請查閱你的提供者文件,瞭解如何使用存取權杖 (Access token) 取得使用者身分資訊,以及在啟動授權流程時需帶哪些參數來取得該存取權杖。
動態用戶端註冊 (Dynamic Client Registration)
本教學不強制需要動態用戶端註冊,但如果你想自動化 MCP 用戶端在授權伺服器的註冊流程,這會很有幫助。詳情請參閱 是否需要動態用戶端註冊?。
設定 MCP 伺服器 (Set up the MCP server)
我們將使用 MCP 官方 SDK 建立一個 MCP 伺服器,並實作一個 whoami 工具,從授權伺服器取得使用者身分資訊。
建立新專案 (Create a new project)
- Python
- Node.js
mkdir mcp-server
cd mcp-server
uv init # 或使用 `pipenv` 或 `poetry` 建立新虛擬環境
建立新的 Node.js 專案:
mkdir mcp-server
cd mcp-server
npm init -y # 或使用 `pnpm init`
npm pkg set type="module"
npm pkg set main="whoami.js"
npm pkg set scripts.start="node whoami.js"
安裝 MCP SDK 與相依套件 (Install the MCP SDK and dependencies)
- Python
- Node.js
pip install "mcp[cli]" starlette uvicorn或使用你偏好的套件管理工具,如 uv 或 poetry。
npm install @modelcontextprotocol/sdk express或使用你偏好的套件管理工具,如 pnpm 或 yarn。
建立 MCP 伺服器 (Create the MCP server)
首先,讓我們建立一個實作 whoami 工具的 MCP 伺服器。
- Python
- Node.js
建立名為 whoami.py 的檔案,並加入以下程式碼:
from mcp.server.fastmcp import FastMCP
from starlette.applications import Starlette
from starlette.routing import Mount
from typing import Any

mcp = FastMCP("WhoAmI")

@mcp.tool()
def whoami() -> dict[str, Any]:
    """回傳目前使用者資訊的工具。"""
    return {"error": "Not authenticated"}

app = Starlette(
    routes=[Mount('/', app=mcp.sse_app())]
)
以以下指令啟動伺服器:
uvicorn whoami:app --host 0.0.0.0 --port 3001由於目前 MCP inspector 尚未支援授權流程,我們將採用 SSE 方式設定 MCP 伺服器。待 MCP inspector 支援授權流程後,會更新此處程式碼。
你也可以選擇使用 pnpm 或 yarn。
建立名為 whoami.js 的檔案,並加入以下程式碼:
import { McpServer } from '@modelcontextprotocol/sdk/server/mcp.js';
import { SSEServerTransport } from '@modelcontextprotocol/sdk/server/sse.js';
import express from 'express';

// 建立 MCP 伺服器
const server = new McpServer({
  name: 'WhoAmI',
  version: '0.0.0',
});

// 新增一個回傳目前使用者資訊的工具
server.tool('whoami', async () => {
  return {
    content: [{ type: 'text', text: JSON.stringify({ error: 'Not authenticated' }) }],
  };
});

// 以下為 MCP SDK 文件的樣板程式碼
const PORT = 3001;
const app = express();

const transports = {};

app.get('/sse', async (_req, res) => {
  const transport = new SSEServerTransport('/messages', res);
  transports[transport.sessionId] = transport;

  res.on('close', () => {
    delete transports[transport.sessionId];
  });

  await server.connect(transport);
});

app.post('/messages', async (req, res) => {
  const sessionId = String(req.query.sessionId);
  const transport = transports[sessionId];
  if (transport) {
    await transport.handlePostMessage(req, res, req.body);
  } else {
    res.status(400).send('No transport found for sessionId');
  }
});

app.listen(PORT);
以以下指令啟動伺服器:
npm start檢查 MCP 伺服器 (Inspect the MCP server)
下載並執行 MCP inspector (Clone and run MCP inspector)
現在 MCP 伺服器已啟動,我們可以使用 MCP inspector 檢查 whoami 工具是否可用。
由於目前實作上的限制,我們 fork 了 MCP inspector,讓其在驗證 (Authentication) 與授權 (Authorization) 上更靈活且可擴展。我們也已向原始倉庫提交 pull request。
執行 MCP inspector,請使用以下指令(需安裝 Node.js):
git clone https://github.com/mcp-auth/inspector.git
cd inspector
npm install
npm run dev
然後在瀏覽器開啟 http://localhost:6274/(或終端機顯示的其他網址)以進入 MCP inspector。
連接 MCP inspector 與 MCP 伺服器 (Connect MCP inspector to the MCP server)
在繼續之前,請檢查 MCP inspector 的以下設定:
- Transport Type:設為
SSE。 - URL:設為你的 MCP 伺服器網址,本例應為
http://localhost:3001/sse。
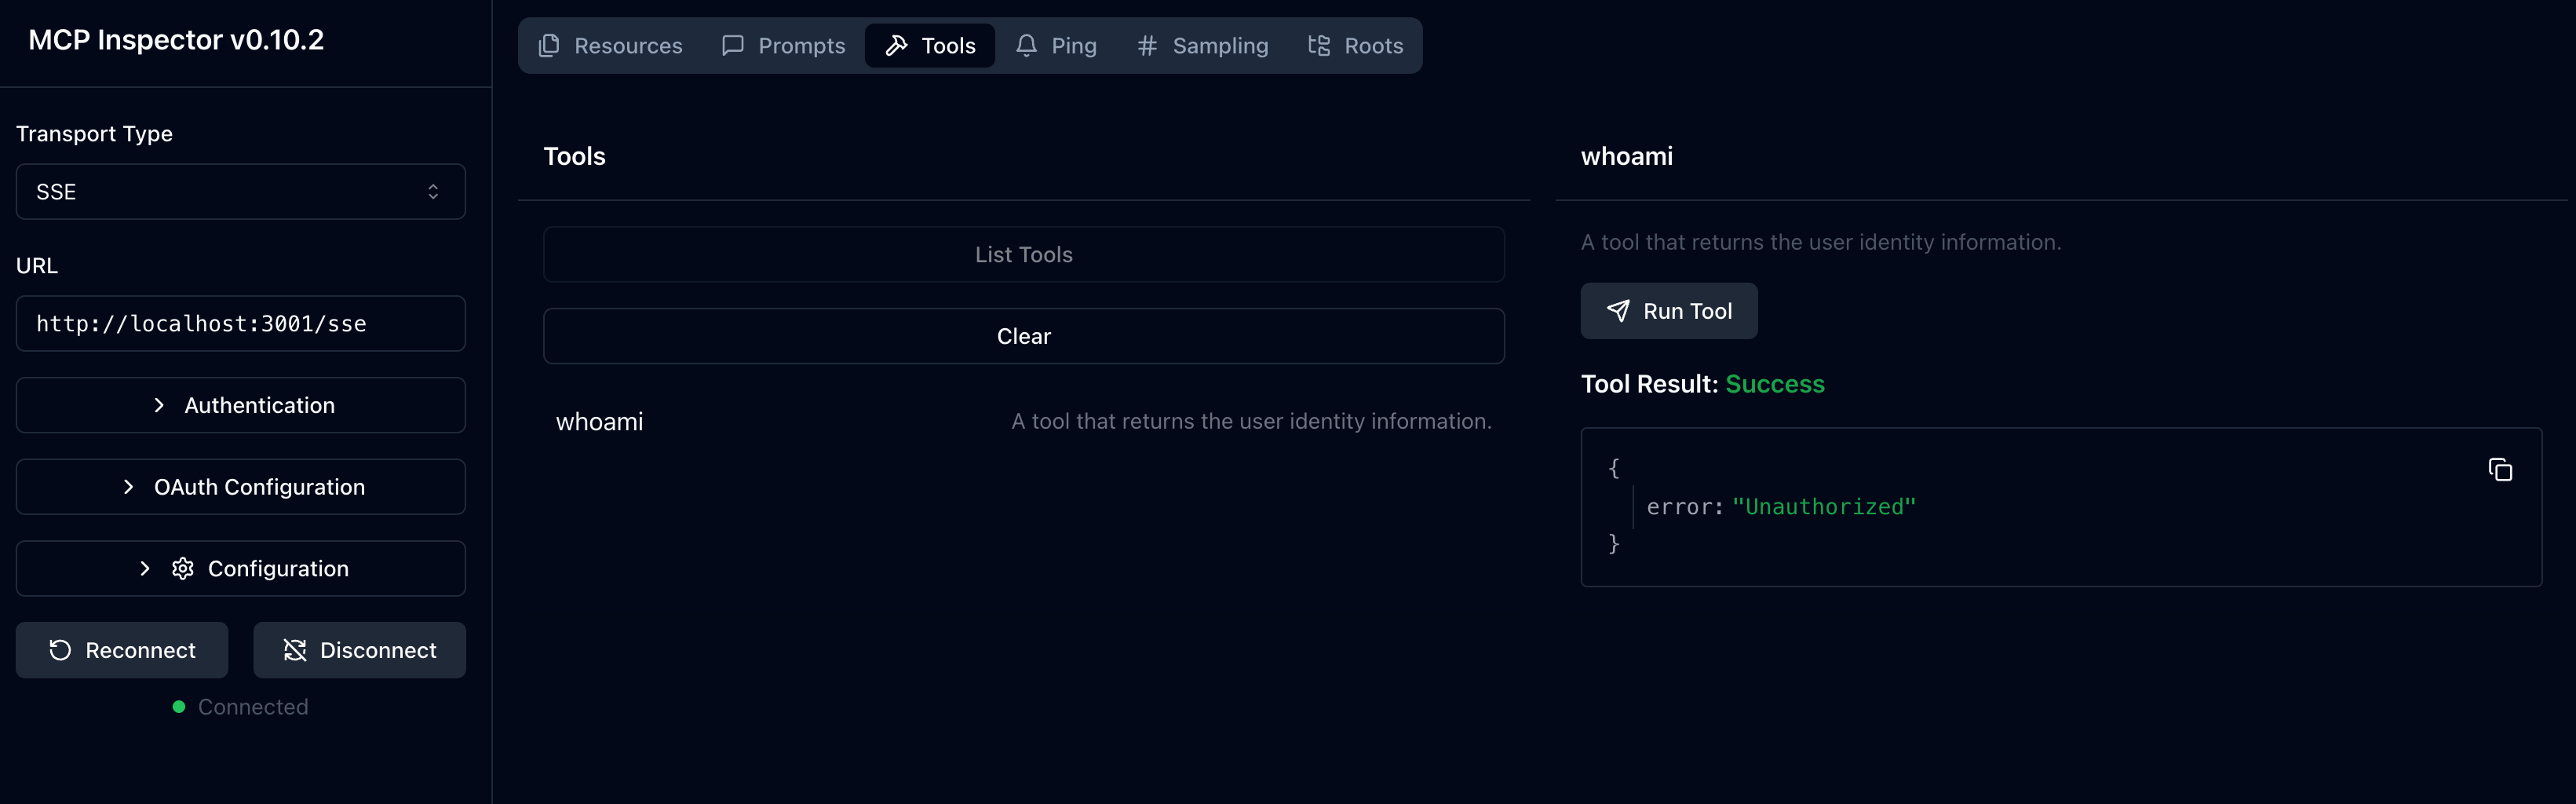
現在你可以點擊「Connect」按鈕,檢查 MCP inspector 是否能連接 MCP 伺服器。如果一切正常,應會看到 MCP inspector 顯示「Connected」狀態。
檢查點:執行 whoami 工具 (Checkpoint: Run the whoami tool)
- 在 MCP inspector 上方選單點選「Tools」分頁。
- 點擊「List Tools」按鈕。
- 你應該會在頁面上看到
whoami工具,點擊它以開啟工具詳情。 - 右側會出現「Run Tool」按鈕,點擊執行工具。
- 你應該會看到工具回傳結果為 JSON:
{"error": "Not authenticated"}。
與授權伺服器整合 (Integrate with your authorization server)
完成本節需考慮以下幾點:
你的授權伺服器簽發者 (Issuer) URL
通常是你的授權伺服器基礎網址,例如 https://auth.example.com。有些提供者可能會有路徑,如 https://example.logto.app/oidc,請參閱你的提供者文件。
如何取得授權伺服器中繼資料 (Metadata)
- 若你的授權伺服器符合 OAuth 2.0 授權伺服器中繼資料 (RFC 8414) 或 OpenID Connect Discovery,可直接用 MCP Auth 內建工具自動取得中繼資料。
- 若不符合上述標準,需手動在 MCP 伺服器設定中指定中繼資料網址或 endpoint,請查閱你的提供者文件。
如何將 MCP inspector 註冊為授權伺服器用戶端
- 若你的授權伺服器支援 動態用戶端註冊 (Dynamic Client Registration),可略過此步驟,MCP inspector 會自動註冊。
- 若不支援,需手動將 MCP inspector 註冊為用戶端。
如何取得使用者身分資訊,以及如何設定授權請求參數
-
對於 OpenID Connect 提供者:通常需在授權流程請求至少
openid與profile權限範圍 (Scopes)。這可確保授權伺服器回傳的存取權杖 (Access token) 具備存取 userinfo endpoint 所需權限。注意:部分提供者可能不支援 userinfo endpoint。
-
對於 OAuth 2.0 / OAuth 2.1 提供者:請查閱你的提供者文件,瞭解如何用存取權杖 (Access token) 取得使用者身分資訊,以及啟動授權流程時需帶哪些參數。
雖然每個提供者可能有不同需求,以下步驟將引導你整合 MCP inspector 與 MCP 伺服器,並進行提供者專屬設定。
註冊 MCP inspector 為用戶端 (Register MCP inspector as a client)
- Logto
- Keycloak
- OIDC
- OAuth 2
與 Logto 整合非常簡單,因為它是支援標準 userinfo endpoint 的 OpenID Connect 提供者。
由於 Logto 尚未支援動態用戶端註冊,你需手動將 MCP inspector 註冊為 Logto 租戶的用戶端:
- 開啟 MCP inspector,點擊「OAuth Configuration」按鈕。複製 Redirect URL (auto-populated),例如
http://localhost:6274/oauth/callback。 - 登入 Logto Console(或你的自架 Logto Console)。
- 進入「應用程式」分頁,點擊「建立應用程式」。頁面底部點「不使用框架建立應用程式」。
- 填寫應用程式資訊,然後點擊「建立應用程式」:
- 選擇應用程式類型:選「單頁應用程式」。
- 應用程式名稱:如「MCP Inspector」。
- 在「設定 / Redirect URIs」區塊,貼上剛才複製的 Redirect URL (auto-populated),然後點擊底部「儲存變更」。
- 頁面上方會看到「App ID」,請複製。
- 回到 MCP inspector,將「App ID」貼到「OAuth Configuration」的「Client ID」欄位。
- 在「Auth Params」欄位輸入
{"scope": "openid profile email"},確保 Logto 回傳的存取權杖 (Access token) 具備存取 userinfo endpoint 所需權限。
Keycloak 是一個開源身分與存取管理解決方案,支援 OpenID Connect 協議。
雖然 Keycloak 支援動態用戶端註冊,但其註冊 endpoint 不支援 CORS,導致大多數 MCP 用戶端無法直接註冊。因此需手動註冊。
Keycloak 可用多種方式安裝(官方說明),本教學以 Docker 快速安裝為例。
設定 Keycloak 並進行相關配置:
- 依 官方文件 用 Docker 啟動 Keycloak:
docker run -p 8080:8080 -e KC_BOOTSTRAP_ADMIN_USERNAME=admin -e KC_BOOTSTRAP_ADMIN_PASSWORD=admin quay.io/keycloak/keycloak:26.2.4 start-dev-
進入 Keycloak 管理後台 (http://localhost:8080/admin),以以下帳密登入:
- 使用者名稱:
admin - 密碼:
admin
- 使用者名稱:
-
建立新 Realm:
- 左上角點「Create Realm」
- 「Realm name」填入
mcp-realm - 點「Create」
-
建立測試使用者:
- 左側選單點「Users」
- 點「Create new user」
- 填寫使用者資訊:
- Username:
testuser - 名字與姓氏可任意填
- Username:
- 點「Create」
- 在「Credentials」分頁設定密碼並取消「Temporary」
-
註冊 MCP Inspector 為用戶端:
- 開啟 MCP inspector,點擊「OAuth Configuration」按鈕。複製 Redirect URL (auto-populated),如
http://localhost:6274/oauth/callback。 - 在 Keycloak 管理後台,左側選單點「Clients」
- 點「Create client」
- 填寫用戶端資訊:
- Client type:選「OpenID Connect」
- Client ID:填
mcp-inspector - 點「Next」
- 「Capability config」頁面:
- 確認「Standard flow」已啟用
- 點「Next」
- 「Login settings」頁面:
- 貼上 MCP Inspector callback URL 至「Valid redirect URIs」
- 「Web origins」填入
http://localhost:6274 - 點「Save」
- 複製「Client ID」(即
mcp-inspector)
- 開啟 MCP inspector,點擊「OAuth Configuration」按鈕。複製 Redirect URL (auto-populated),如
-
回到 MCP Inspector:
- 將複製的 Client ID 貼到「OAuth Configuration」的「Client ID」欄位
- 「Auth Params」欄位輸入以下內容以請求必要權限範圍:
{ "scope": "openid profile email" }這是通用 OpenID Connect 提供者整合指引,請查閱你的提供者文件以獲得細節。
若你的 OpenID Connect 提供者支援動態用戶端註冊,可直接跳至第 8 步設定 MCP inspector;否則需手動註冊:
- 開啟 MCP inspector,點擊「OAuth Configuration」按鈕。複製 Redirect URL (auto-populated),如
http://localhost:6274/oauth/callback。 - 登入你的 OpenID Connect 提供者後台。
- 進入「應用程式」或「用戶端」區塊,建立新應用程式或用戶端。
- 若需選擇用戶端類型,請選「單頁應用程式」或「公開用戶端」。
- 建立應用程式後,設定 redirect URI,貼上 MCP inspector 的 Redirect URL (auto-populated)。
- 找到新應用程式的「Client ID」或「Application ID」並複製。
- 回到 MCP inspector,將「Client ID」貼到「OAuth Configuration」的「Client ID」欄位。
- 標準 OIDC 提供者可在「Auth Params」欄位輸入以下內容,以請求 userinfo endpoint 所需權限範圍:
{ "scope": "openid profile email" }這是通用 OAuth 2.0 / OAuth 2.1 提供者整合指引,請查閱你的提供者文件以獲得細節。
若你的 OAuth 2.0 / OAuth 2.1 提供者支援動態用戶端註冊,可直接跳至第 8 步設定 MCP inspector;否則需手動註冊:
- 開啟 MCP inspector,點擊「OAuth Configuration」按鈕。複製 Redirect URL (auto-populated),如
http://localhost:6274/oauth/callback。 - 登入你的 OAuth 2.0 / OAuth 2.1 提供者後台。
- 進入「應用程式」或「用戶端」區塊,建立新應用程式或用戶端。
- 若需選擇用戶端類型,請選「單頁應用程式」或「公開用戶端」。
- 建立應用程式後,設定 redirect URI,貼上 MCP inspector 的 Redirect URL (auto-populated)。
- 找到新應用程式的「Client ID」或「Application ID」並複製。
- 回到 MCP inspector,將「Client ID」貼到「OAuth Configuration」的「Client ID」欄位。
- 請查閱你的提供者文件,瞭解如何取得用於身分資訊的存取權杖 (Access token)。你可能需指定權限範圍或參數。例如,若需
profile權限範圍,可在「Auth Params」欄位輸入:
{ "scope": "profile" }設定 MCP Auth (Set up MCP auth)
在你的 MCP 伺服器專案中,需安裝 MCP Auth SDK 並設定使用你的授權伺服器中繼資料。
- Python
- Node.js
首先安裝 mcpauth 套件:
pip install mcpauth或使用你偏好的套件管理工具,如 uv 或 poetry。
首先安裝 mcp-auth 套件:
npm install mcp-authMCP Auth 需要授權伺服器中繼資料才能初始化。根據你的提供者:
- Logto
- Keycloak
- OIDC
- OAuth 2
簽發者 (Issuer) URL 可在 Logto Console 的應用程式詳情頁「Endpoints & Credentials / Issuer endpoint」區塊找到,格式類似 https://my-project.logto.app/oidc。
- Python
- Node.js
將 whoami.py 更新,加入 MCP Auth 設定:
from mcpauth import MCPAuth
from mcpauth.config import AuthServerType
from mcpauth.utils import fetch_server_config

auth_issuer = '<issuer-endpoint>'  # 請替換為你的簽發者 (Issuer) 端點
auth_server_config = fetch_server_config(auth_issuer, type=AuthServerType.OIDC)
mcp_auth = MCPAuth(server=auth_server_config)
將 whoami.js 更新,加入 MCP Auth 設定:
import { MCPAuth, fetchServerConfig } from 'mcp-auth';

const authIssuer = '<issuer-endpoint>'; // 請替換為你的簽發者 (Issuer) 端點
const mcpAuth = new MCPAuth({
  server: await fetchServerConfig(authIssuer, { type: 'oidc' }),
});
接下來,我們需要建立一個自訂的存取權杖 (Access token) 驗證器,該驗證器會使用 MCP inspector 提供的存取權杖,從授權伺服器 (Authorization server) 取得使用者身分資訊。
- Python
- Node.js
import pydantic
import requests
from mcpauth.exceptions import (
    MCPAuthTokenVerificationException,
    MCPAuthTokenVerificationExceptionCode,
)
from mcpauth.types import AuthInfo

def verify_access_token(token: str) -> AuthInfo:
    """
    透過從授權伺服器 (Authorization server) 取得使用者資訊,驗證所提供的 Bearer 權杖 (Token)。
    若權杖有效,將回傳包含使用者資訊的 `AuthInfo` 物件。

    :param token: 從 MCP inspector 接收到的 Bearer 權杖 (Token)。
    """

    issuer = auth_server_config.metadata.issuer
    endpoint = auth_server_config.metadata.userinfo_endpoint # 提供者應支援 userinfo endpoint
    if not endpoint:
        raise ValueError(
            "auth server metadata 中未設定 userinfo endpoint。"
        )

    try:
        response = requests.get(
            endpoint,
            headers={"Authorization": f"Bearer {token}"}, # 標準 Bearer 權杖標頭
        )
        response.raise_for_status() # 確保 HTTP 錯誤時會拋出例外
        json = response.json() # 解析 JSON 回應
        return AuthInfo(
            token=token,
            subject=json.get("sub"), # 'sub' 是主體 (Subject, 使用者 ID) 的標準宣告 (Claim)
            issuer=issuer, # 使用 metadata 中的簽發者 (Issuer)
            claims=json, # 包含 userinfo endpoint 回傳的所有宣告 (Claims)
        )
    # `AuthInfo` 是 Pydantic 模型,驗證錯誤通常代表回應結構不符預期
    except pydantic.ValidationError as e:
        raise MCPAuthTokenVerificationException(
            MCPAuthTokenVerificationExceptionCode.INVALID_TOKEN,
            cause=e,
        )
    # 處理請求過程中可能發生的其他例外
    except Exception as e:
        raise MCPAuthTokenVerificationException(
            MCPAuthTokenVerificationExceptionCode.TOKEN_VERIFICATION_FAILED,
            cause=e,
        )
import { MCPAuthTokenVerificationError } from 'mcp-auth';
/**
* 透過從授權伺服器 (Authorization server) 取得使用者資訊,驗證所提供的 Bearer 權杖 (Token)。
* 若權杖有效,將回傳包含使用者資訊的 `AuthInfo` 物件。
*/
const verifyToken = async (token) => {
const { issuer, userinfoEndpoint } = mcpAuth.config.server.metadata;
if (!userinfoEndpoint) {
throw new Error('server metadata 中未設定 userinfo endpoint');
}
const response = await fetch(userinfoEndpoint, {
headers: { Authorization: `Bearer ${token}` },
});
if (!response.ok) {
throw new MCPAuthTokenVerificationError('token_verification_failed', response);
}
const userInfo = await response.json();
if (typeof userInfo !== 'object' || userInfo === null || !('sub' in userInfo)) {
throw new MCPAuthTokenVerificationError('invalid_token', response);
}
return {
token,
issuer,
subject: String(userInfo.sub), // 'sub' 是主體 (Subject, 使用者 ID) 的標準宣告 (Claim)
clientId: '', // 本範例未使用 Client ID,如有需要可設定
scopes: [],
claims: userInfo,
};
};簽發者 (Issuer) URL 可在 Keycloak 管理後台的「mcp-realm」下「Realm settings / Endpoints」區塊,點選「OpenID Endpoint Configuration」連結。JSON 文件中的 issuer 欄位即為你的 issuer URL,格式類似 http://localhost:8080/realms/mcp-realm。
- Python
- Node.js
將 whoami.py 更新,加入 MCP Auth 設定:
from mcpauth import MCPAuth
from mcpauth.config import AuthServerType
from mcpauth.utils import fetch_server_config

auth_issuer = '<issuer-endpoint>'  # 請替換為你的簽發者 (Issuer) 端點
auth_server_config = fetch_server_config(auth_issuer, type=AuthServerType.OIDC)
mcp_auth = MCPAuth(server=auth_server_config)
將 whoami.js 更新,加入 MCP Auth 設定:
import { MCPAuth, fetchServerConfig } from 'mcp-auth';

const authIssuer = '<issuer-endpoint>'; // 請替換為你的簽發者 (Issuer) 端點
const mcpAuth = new MCPAuth({
  server: await fetchServerConfig(authIssuer, { type: 'oidc' }),
});
接下來,我們需要建立一個自訂的存取權杖 (Access token) 驗證器,該驗證器會使用 MCP inspector 提供的存取權杖,從授權伺服器 (Authorization server) 取得使用者身分資訊。
- Python
- Node.js
import pydantic
import requests
from mcpauth.exceptions import (
    MCPAuthTokenVerificationException,
    MCPAuthTokenVerificationExceptionCode,
)
from mcpauth.types import AuthInfo

def verify_access_token(token: str) -> AuthInfo:
    """
    透過從授權伺服器 (Authorization server) 取得使用者資訊,驗證所提供的 Bearer 權杖 (Token)。
    若權杖有效,將回傳包含使用者資訊的 `AuthInfo` 物件。

    :param token: 從 MCP inspector 接收到的 Bearer 權杖 (Token)。
    """

    issuer = auth_server_config.metadata.issuer
    endpoint = auth_server_config.metadata.userinfo_endpoint # 提供者應支援 userinfo endpoint
    if not endpoint:
        raise ValueError(
            "auth server metadata 中未設定 userinfo endpoint。"
        )

    try:
        response = requests.get(
            endpoint,
            headers={"Authorization": f"Bearer {token}"}, # 標準 Bearer 權杖標頭
        )
        response.raise_for_status() # 確保 HTTP 錯誤時會拋出例外
        json = response.json() # 解析 JSON 回應
        return AuthInfo(
            token=token,
            subject=json.get("sub"), # 'sub' 是主體 (Subject, 使用者 ID) 的標準宣告 (Claim)
            issuer=issuer, # 使用 metadata 中的簽發者 (Issuer)
            claims=json, # 包含 userinfo endpoint 回傳的所有宣告 (Claims)
        )
    # `AuthInfo` 是 Pydantic 模型,驗證錯誤通常代表回應結構不符預期
    except pydantic.ValidationError as e:
        raise MCPAuthTokenVerificationException(
            MCPAuthTokenVerificationExceptionCode.INVALID_TOKEN,
            cause=e,
        )
    # 處理請求過程中可能發生的其他例外
    except Exception as e:
        raise MCPAuthTokenVerificationException(
            MCPAuthTokenVerificationExceptionCode.TOKEN_VERIFICATION_FAILED,
            cause=e,
        )
import { MCPAuthTokenVerificationError } from 'mcp-auth';
/**
* 透過從授權伺服器 (Authorization server) 取得使用者資訊,驗證所提供的 Bearer 權杖 (Token)。
* 若權杖有效,將回傳包含使用者資訊的 `AuthInfo` 物件。
*/
const verifyToken = async (token) => {
const { issuer, userinfoEndpoint } = mcpAuth.config.server.metadata;
if (!userinfoEndpoint) {
throw new Error('server metadata 中未設定 userinfo endpoint');
}
const response = await fetch(userinfoEndpoint, {
headers: { Authorization: `Bearer ${token}` },
});
if (!response.ok) {
throw new MCPAuthTokenVerificationError('token_verification_failed', response);
}
const userInfo = await response.json();
if (typeof userInfo !== 'object' || userInfo === null || !('sub' in userInfo)) {
throw new MCPAuthTokenVerificationError('invalid_token', response);
}
return {
token,
issuer,
subject: String(userInfo.sub), // 'sub' 是主體 (Subject, 使用者 ID) 的標準宣告 (Claim)
clientId: '', // 本範例未使用 Client ID,如有需要可設定
scopes: [],
claims: userInfo,
};
};以下程式碼假設授權伺服器支援 userinfo endpoint 以取得使用者身分資訊。若你的提供者不支援,請查閱文件並以正確 URL 取代 userinfo endpoint 變數。
- Python
- Node.js
將 whoami.py 更新,加入 MCP Auth 設定:
from mcpauth import MCPAuth
from mcpauth.config import AuthServerType
from mcpauth.utils import fetch_server_config

auth_issuer = '<issuer-endpoint>'  # 請替換為你的簽發者 (Issuer) 端點
auth_server_config = fetch_server_config(auth_issuer, type=AuthServerType.OIDC)
mcp_auth = MCPAuth(server=auth_server_config)
將 whoami.js 更新,加入 MCP Auth 設定:
import { MCPAuth, fetchServerConfig } from 'mcp-auth';

const authIssuer = '<issuer-endpoint>'; // 請替換為你的簽發者 (Issuer) 端點
const mcpAuth = new MCPAuth({
  server: await fetchServerConfig(authIssuer, { type: 'oidc' }),
});
在某些情況下,provider 的回應可能格式錯誤或不符合預期的 metadata 格式。如果你確定 provider 是相容的,可以透過設定選項轉譯 metadata:
- Python
- Node.js
mcp_auth = MCPAuth(
    server=fetch_server_config(
        # ...其他選項
        transpile_data=lambda data: {**data, 'response_types_supported': ['code']}
    )
)
const mcpAuth = new MCPAuth({
server: await fetchServerConfig(authIssuer, {
// ...其他選項
transpileData: (data) => ({ ...data, response_types_supported: ['code'] }),
}),
});如果你的提供者不支援 OpenID Connect Discovery,你可以手動指定中繼資料 URL 或端點。詳情請參閱 其他初始化 MCP Auth 的方式。
接下來,我們需要建立一個自訂的存取權杖 (Access token) 驗證器,該驗證器會使用 MCP inspector 提供的存取權杖,從授權伺服器 (Authorization server) 取得使用者身分資訊。
- Python
- Node.js
import pydantic
import requests
from mcpauth.exceptions import (
    MCPAuthTokenVerificationException,
    MCPAuthTokenVerificationExceptionCode,
)
from mcpauth.types import AuthInfo

def verify_access_token(token: str) -> AuthInfo:
    """
    透過從授權伺服器 (Authorization server) 取得使用者資訊,驗證所提供的 Bearer 權杖 (Token)。
    若權杖有效,將回傳包含使用者資訊的 `AuthInfo` 物件。

    :param token: 從 MCP inspector 接收到的 Bearer 權杖 (Token)。
    """

    issuer = auth_server_config.metadata.issuer
    endpoint = auth_server_config.metadata.userinfo_endpoint # 提供者應支援 userinfo endpoint
    if not endpoint:
        raise ValueError(
            "auth server metadata 中未設定 userinfo endpoint。"
        )

    try:
        response = requests.get(
            endpoint,
            headers={"Authorization": f"Bearer {token}"}, # 標準 Bearer 權杖標頭
        )
        response.raise_for_status() # 確保 HTTP 錯誤時會拋出例外
        json = response.json() # 解析 JSON 回應
        return AuthInfo(
            token=token,
            subject=json.get("sub"), # 'sub' 是主體 (Subject, 使用者 ID) 的標準宣告 (Claim)
            issuer=issuer, # 使用 metadata 中的簽發者 (Issuer)
            claims=json, # 包含 userinfo endpoint 回傳的所有宣告 (Claims)
        )
    # `AuthInfo` 是 Pydantic 模型,驗證錯誤通常代表回應結構不符預期
    except pydantic.ValidationError as e:
        raise MCPAuthTokenVerificationException(
            MCPAuthTokenVerificationExceptionCode.INVALID_TOKEN,
            cause=e,
        )
    # 處理請求過程中可能發生的其他例外
    except Exception as e:
        raise MCPAuthTokenVerificationException(
            MCPAuthTokenVerificationExceptionCode.TOKEN_VERIFICATION_FAILED,
            cause=e,
        )
import { MCPAuthTokenVerificationError } from 'mcp-auth';
/**
* 透過從授權伺服器 (Authorization server) 取得使用者資訊,驗證所提供的 Bearer 權杖 (Token)。
* 若權杖有效,將回傳包含使用者資訊的 `AuthInfo` 物件。
*/
const verifyToken = async (token) => {
const { issuer, userinfoEndpoint } = mcpAuth.config.server.metadata;
if (!userinfoEndpoint) {
throw new Error('server metadata 中未設定 userinfo endpoint');
}
const response = await fetch(userinfoEndpoint, {
headers: { Authorization: `Bearer ${token}` },
});
if (!response.ok) {
throw new MCPAuthTokenVerificationError('token_verification_failed', response);
}
const userInfo = await response.json();
if (typeof userInfo !== 'object' || userInfo === null || !('sub' in userInfo)) {
throw new MCPAuthTokenVerificationError('invalid_token', response);
}
return {
token,
issuer,
subject: String(userInfo.sub), // 'sub' 是主體 (Subject, 使用者 ID) 的標準宣告 (Claim)
clientId: '', // 本範例未使用 Client ID,如有需要可設定
scopes: [],
claims: userInfo,
};
};如前所述,OAuth 2.0 沒有定義標準方式來取得使用者身分資訊。以下程式碼假設你的提供者有特定 endpoint 可用存取權杖 (Access token) 取得身分資訊。請查閱文件並以正確 URL 取代 userinfo endpoint 變數。
- Python
- Node.js
更新 whoami.py,加入 MCP Auth 設定:
from mcpauth import MCPAuth
from mcpauth.config import AuthServerType
from mcpauth.utils import fetch_server_config

auth_issuer = '<issuer-endpoint>'  # 請替換為你的簽發者 (Issuer) 端點
auth_server_config = fetch_server_config(auth_issuer, type=AuthServerType.OAUTH)
mcp_auth = MCPAuth(server=auth_server_config)
更新 whoami.js,加入 MCP Auth 設定:
import { MCPAuth, fetchServerConfig } from 'mcp-auth';

const authIssuer = '<issuer-endpoint>'; // 請替換為你的簽發者 (Issuer) 端點
const mcpAuth = new MCPAuth({
  server: await fetchServerConfig(authIssuer, { type: 'oauth' }),
});
在某些情況下,provider 的回應可能格式錯誤或不符合預期的 metadata 格式。如果你確定 provider 是相容的,可以透過設定選項轉譯 metadata:
- Python
- Node.js
mcp_auth = MCPAuth(
    server=fetch_server_config(
        # ...其他選項
        transpile_data=lambda data: {**data, 'response_types_supported': ['code']}
    )
)
const mcpAuth = new MCPAuth({
server: await fetchServerConfig(authIssuer, {
// ...其他選項
transpileData: (data) => ({ ...data, response_types_supported: ['code'] }),
}),
});如果你的提供者不支援 OAuth 2.0 授權伺服器中繼資料 (Authorization Server Metadata),你可以手動指定中繼資料 URL 或端點。詳情請參閱 其他初始化 MCP Auth 的方式。
接下來,我們需要建立一個自訂的存取權杖 (Access token) 驗證器,該驗證器會使用 MCP inspector 提供的存取權杖,從授權伺服器取得使用者身分資訊。
- Python
- Node.js
import pydantic
import requests
from mcpauth.exceptions import (
    MCPAuthTokenVerificationException,
    MCPAuthTokenVerificationExceptionCode,
)
from mcpauth.types import AuthInfo

def verify_access_token(token: str) -> AuthInfo:
    """
    透過向授權伺服器取得使用者資訊來驗證提供的 Bearer 權杖 (Token)。
    若權杖有效,將回傳包含使用者資訊的 `AuthInfo` 物件。

    :param token: 從 MCP inspector 接收到的 Bearer 權杖 (Token)。
    """

    try:
        # 以下程式碼假設你的授權伺服器有一個可用於存取權杖 (Access token) 查詢使用者資訊的端點。
        # 請依據你的服務提供者 API 調整 URL 與 headers。
        response = requests.get(
            "https://your-authorization-server.com/userinfo",
            headers={"Authorization": f"Bearer {token}"},
        )
        response.raise_for_status() # 確保 HTTP 錯誤時會拋出例外
        json = response.json() # 解析 JSON 回應

        # 以下程式碼假設 user info 回應物件中有一個 'sub' 欄位用於識別使用者。
        # 你可能需要根據服務提供者 API 調整這部分。
        return AuthInfo(
            token=token,
            subject=json.get("sub"),
            issuer=auth_issuer, # 使用已設定的簽發者 (Issuer)
            claims=json, # 包含端點回傳的所有宣告 (Claims/JSON 欄位)
        )
    # `AuthInfo` 是 Pydantic 模型,驗證錯誤通常代表回應結構不符預期
    except pydantic.ValidationError as e:
        raise MCPAuthTokenVerificationException(
            MCPAuthTokenVerificationExceptionCode.INVALID_TOKEN,
            cause=e,
        )
    # 處理請求過程中可能發生的其他例外
    except Exception as e:
        raise MCPAuthTokenVerificationException(
            MCPAuthTokenVerificationExceptionCode.TOKEN_VERIFICATION_FAILED,
            cause=e,
        )
import { MCPAuthTokenVerificationError } from 'mcp-auth';
/**
* 透過向授權伺服器取得使用者資訊來驗證提供的 Bearer 權杖 (Token)。
* 若權杖有效,將回傳包含使用者資訊的 `AuthInfo` 物件。
*/
const verifyToken = async (token) => {
// 以下程式碼假設你的授權伺服器有一個可用於存取權杖 (Access token) 查詢使用者資訊的端點。
// 請依據你的服務提供者 API 調整 URL 與 headers。
const response = await fetch('https://your-authorization-server.com/userinfo', {
headers: { Authorization: `Bearer ${token}` },
});
if (!response.ok) {
throw new MCPAuthTokenVerificationError('token_verification_failed', response);
}
const userInfo = await response.json();
// 以下程式碼假設 user info 回應物件中有一個 'sub' 欄位用於識別使用者。
// 你可能需要根據服務提供者 API 調整這部分。
if (typeof userInfo !== 'object' || userInfo === null || !('sub' in userInfo)) {
throw new MCPAuthTokenVerificationError('invalid_token', response);
}
return {
token,
issuer: authIssuer,
subject: String(userInfo.sub), // 根據服務提供者的使用者 ID 欄位調整
clientId: '', // 此範例未使用 Client ID,如有需要可設定
scopes: [],
claims: userInfo,
};
};更新 MCP 伺服器 (Update MCP server)
快完成了!現在要更新 MCP 伺服器,套用 MCP Auth 路由與中介軟體,並讓 whoami 工具回傳實際的使用者身分資訊。
- Python
- Node.js
@mcp.tool()
def whoami() -> dict[str, Any]:
    """回傳目前使用者資訊的工具。"""
    return (
        mcp_auth.auth_info.claims
        if mcp_auth.auth_info # 由 Bearer auth middleware 填入
        else {"error": "Not authenticated"}
    )

# ...

bearer_auth = Middleware(mcp_auth.bearer_auth_middleware(verify_access_token))
app = Starlette(
    routes=[
        # 加入 metadata 路由 (`/.well-known/oauth-authorization-server`)
        mcp_auth.metadata_route(),
        # 以 Bearer auth middleware 保護 MCP 伺服器
        Mount('/', app=mcp.sse_app(), middleware=[bearer_auth]),
    ],
)server.tool('whoami', ({ authInfo }) => {
return {
content: [
{ type: 'text', text: JSON.stringify(authInfo?.claims ?? { error: 'Not authenticated' }) },
],
};
});
// ...
app.use(mcpAuth.delegatedRouter());
app.use(mcpAuth.bearerAuth(verifyToken));檢查點:以驗證 (Authentication) 執行 whoami 工具 (Checkpoint: Run the whoami tool with authentication)
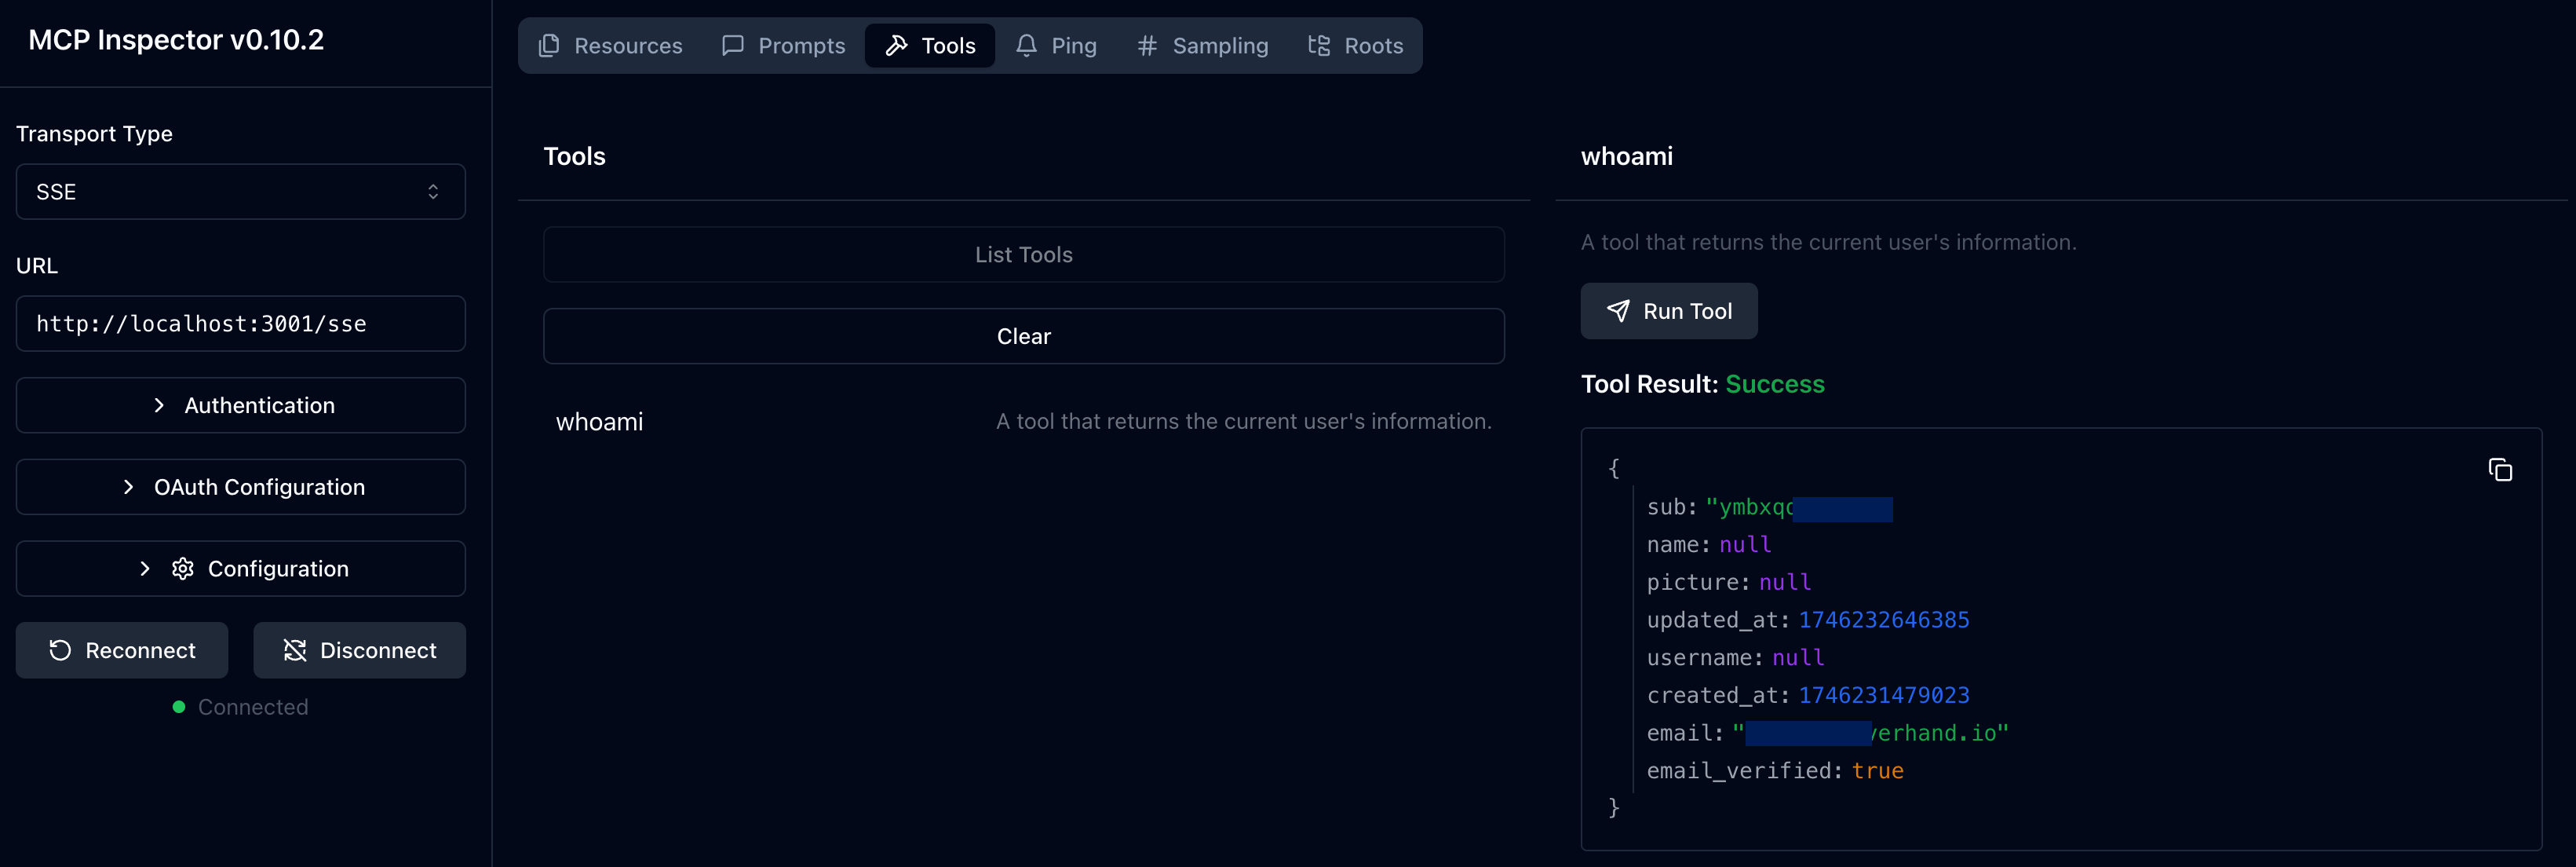
重新啟動 MCP 伺服器,並在瀏覽器開啟 MCP inspector。當你點擊「Connect」按鈕時,應會被導向授權伺服器的登入頁面。
登入後回到 MCP inspector,重複前述步驟執行 whoami 工具。這次你應該會看到授權伺服器回傳的使用者身分資訊。
- Python
- Node.js
完整 MCP 伺服器(OIDC 版本)程式碼請參考 MCP Auth Python SDK repository。
完整 MCP 伺服器(OIDC 版本)程式碼請參考 MCP Auth Node.js SDK repository。該目錄同時包含 TypeScript 與 JavaScript 版本。
結語 (Closing notes)
🎊 恭喜你!已成功完成本教學。讓我們回顧一下:
- 建立具備
whoami工具的基本 MCP 伺服器 - 透過 MCP Auth 將 MCP 伺服器與授權伺服器整合
- 設定 MCP Inspector 以驗證 (Authentication) 使用者並取得其身分資訊
你也可以進一步探索進階主題,包括:
- 使用 JWT (JSON Web Token) 進行驗證 (Authentication) 與授權 (Authorization)
- 利用 資源標示符 (Resource indicators, RFC 8707) 指定存取資源
- 實作自訂存取控制機制,如 基於角色的存取控制 (RBAC, Role-based access control) 或 屬性型存取控制 (ABAC, Attribute-based access control)
歡迎參閱其他教學與文件,充分發揮 MCP Auth 的效能。